Waves Through the Lens: The History of Surf Photography in Waikiki and the Impact of Tommy Pierucki

Introduction

Aloha and welcome to a visual odyssey through the history of surf photography in Waikiki, where we'll also shine a spotlight on the remarkable contributions of Tommy Pierucki. Known for its majestic waves and vibrant surf culture, Waikiki has long been a canvas for photographers. Let's dive into the evolution of this art form and explore how Tommy Pierucki is leaving his mark in this picturesque Hawaiian paradise.

The Dawn of Surf Photography

The story of surf photography in Waikiki begins in the early 20th century. Early photographers, armed with basic equipment, captured the essence of surfing in its rawest form. These black-and-white images were more than just photographs; they were the first chapters in the visual storytelling of surfing.

The Evolution Through the 20th Century

As the decades rolled by, surf photography blossomed, particularly in the mid-20th century. The advent of color film brought new life to the images, capturing the azure blues of the ocean and the vibrant surf culture. Waikiki, with its legendary waves and scenic landscapes, became a hotspot for surf photographers, drawing artists from around the globe.

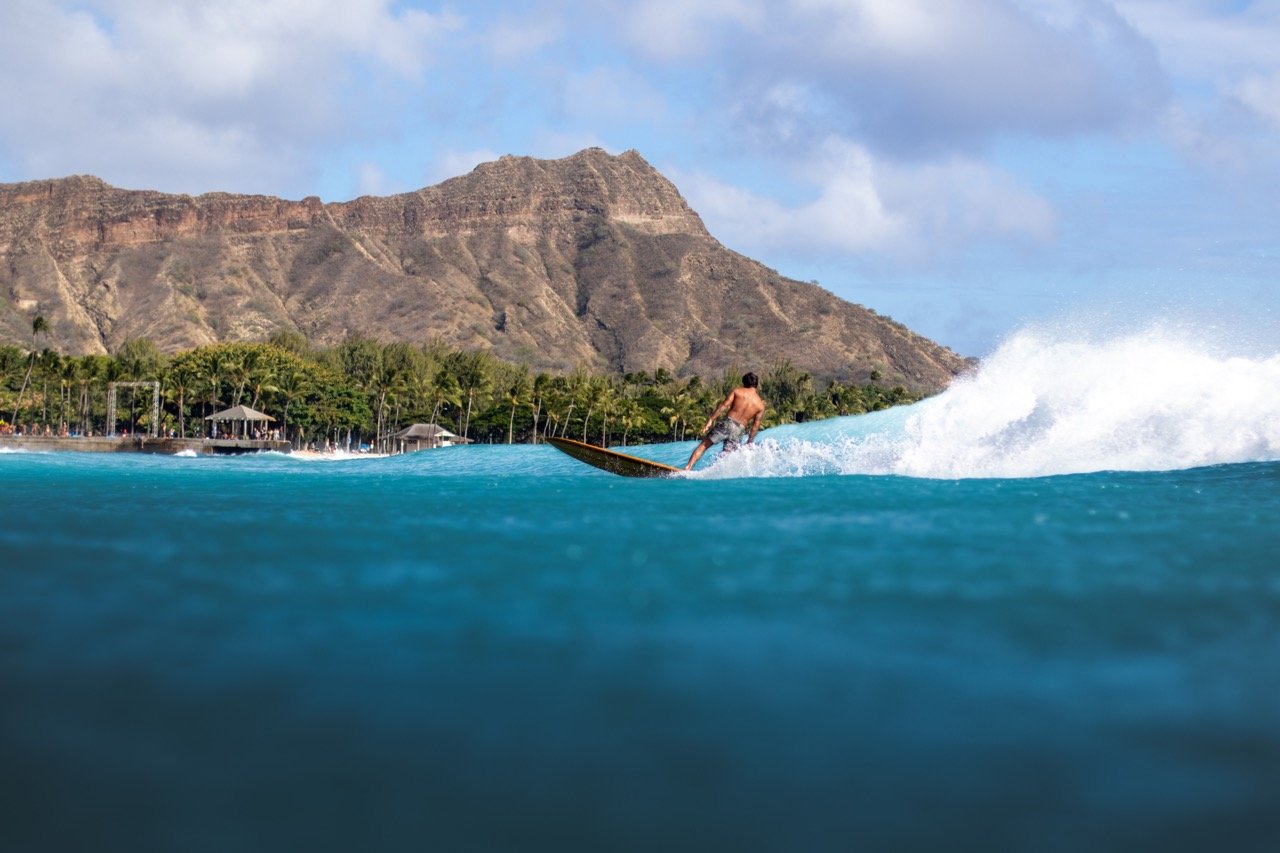
“The King of Queens” - Arthur “Toots” Anchinges as captured by Tommy Pierucki.

Tommy Pierucki: A Modern-Day Maestro

Enter Tommy Pierucki, a contemporary force in the world of surf photography. Tommy’s work stands out for its vivid portrayal of Waikiki's surf scene. With a keen eye for detail and a deep understanding of the sport, Tommy captures not just the action, but the emotion and energy of the surfing experience.

Tommy's Unique Approach

Tommy Pierucki’s approach to surf photography is a blend of technical skill and artistic vision. He excels in capturing the interplay of light, water, and human athleticism, creating images that resonate with both surf enthusiasts and photography lovers. His work not only reflects the current state of surf culture in Waikiki but also pushes the boundaries of the art form.

The Impact of Technology

The digital era has revolutionized surf photography, and Tommy has been at the forefront of this transformation. Utilizing advanced techniques and equipment, he has brought a new perspective to surf photography in Waikiki. His use of drones, underwater cameras, and innovative post-processing techniques have set new standards in the field.

Why Waikiki Remains a Photographic Muse

Waikiki's enduring appeal as a surf photography destination is undeniable. Its consistent waves and picturesque settings continue to attract photographers. For Tommy Pierucki, Waikiki is not just a location but a source of endless inspiration, where each wave and surfer tells a unique story.

Conclusion: Capturing the Soul of Surfing

The journey through the history of surf photography in Waikiki, highlighted by Tommy Pierucki’s contributions, is a testament to the evolving relationship between the photographer, the ocean, and the surfer. Tommy's work continues to capture the soul of surfing in Waikiki, adding vibrant chapters to the ongoing story of this captivating art form.
Navigating the Waves Safely: Why I Choose a Gath Helmet for Longboard Surf Photography

Aloha! I'm Tommy Pierucki, a surf photographer deeply immersed in the world of longboard surfing. When out in the ocean, amidst the waves and surfers, safety is a priority that I never overlook. That's why, for my surf photography sessions, I always gear up with a Gath helmet. Let me share with you why this particular helmet is a staple in my ocean photography adventures.

Unparalleled Head Protection

In surf photography, especially when capturing longboarders who often ride larger waves, the risk of accidental knocks is ever-present. A stray board or a sudden fall can happen anytime. My Gath helmet provides top-notch protection, ensuring that my head is safeguarded against such unforeseen impacts. Its robust construction absorbs shocks effectively, giving me one less thing to worry about when I’m focusing on getting the perfect shot.

Comfort and Fit

Spending hours in the water means I need gear that's comfortable. Gath helmets are lightweight and have an ergonomic design that fits snugly, making them comfortable to wear for extended periods. They don't hinder my movement or distract me, which is crucial when I'm swimming into position or adjusting my angle to capture the surfers in action.

Minimalist and Low Profile Design

As a photographer, I need to maintain a low profile in the water to avoid disturbing the surfers or the natural flow of the waves. Gath helmets have a minimalist design that's sleek and non-intrusive. This aspect is essential for blending into the surroundings and keeping the focus on the surfers, not the photographer.

Excellent Visibility and Compatibility

When tracking surfers on longboards, I need unobstructed vision to anticipate their movements and be ready for the action. Gath helmets offer excellent visibility, which is paramount for capturing those critical moments. Moreover, they are compatible with my other gear, including camera mounts and water housings, allowing me to set up my equipment efficiently and securely.

Durability in Harsh Ocean Conditions

The ocean environment can be harsh on gear, with saltwater, sun, and sand posing constant challenges. My Gath helmet stands up remarkably well to these conditions. Its durability means it's a reliable piece of equipment that I can count on, session after session. The maintenance is minimal, and it withstands the rigors of saltwater exposure without degradation.

Conclusion

In the exhilarating yet unpredictable world of ocean photography, especially when capturing the grace of longboard surfers, a Gath helmet is an indispensable part of my gear. It blends safety, comfort, and functionality seamlessly, allowing me to focus on what I love doing most – capturing the beauty and thrill of surfing. Whether you're a fellow surf photographer or an enthusiast venturing into the waves, consider gearing up with a Gath helmet. It's not just about staying safe; it's about enjoying your ocean adventures to the fullest!

My Trusty Companion in the Ocean: Why I Choose Da Fin for Surf Photography

Hello, Tommy Pierucki here! As a surf photographer, I spend countless hours in the ocean, swimming through waves to capture the perfect moments of surfers in action. One essential piece of gear that's as important as my camera is my choice of fins – Da Fin. I'd love to share with you why Da Fin has become my go-to fin for my ocean photography ventures.

Unmatched Comfort and Efficiency

When you're swimming in the ocean for hours, comfort is key. Da Fin has been a game-changer for me, thanks to their incredibly comfortable fit. No more blisters or chafing, which is a common issue with many other fins I've tried. But it's not just about comfort; these fins offer remarkable efficiency. Their design allows me to swim faster and with less effort, which is crucial when I’m tracking surfers riding the waves or positioning myself for the perfect shot.

Superior Maneuverability and Control

In surf photography, timing and positioning are everything. Da Fin's unique design provides excellent maneuverability and control in the water, allowing me to make quick adjustments and position myself precisely. Whether I'm dealing with strong currents or trying to stay in the right spot to capture a surfer’s aerial trick, these fins give me the agility I need.

Durability That Withstands the Ocean’s Challenges

The ocean can be rough on gear. I need fins that can withstand the constant exposure to salt water, sun, and the physical demands of surf photography. Da Fin has proven to be incredibly durable and resilient, session after session. Their longevity not only makes them a cost-effective choice but also means I can rely on their performance without constant concern for wear and tear.

The Choice of Lifeguards and Professionals

One aspect that initially drew me to Da Fin was knowing that they are the choice of many lifeguards and professional watermen around the world. This endorsement speaks volumes about their reliability and performance in demanding ocean conditions. It gives me an added layer of confidence knowing I'm using equipment that's trusted by ocean professionals.

Perfect Balance of Flexibility and Power

Da Fin strikes the perfect balance between flexibility and power. This balance is crucial for surf photography, where I need to move quickly to keep up with the action but also have the finesse to make fine adjustments in my position. With Da Fin, I can power through rougher waves and maintain a steady pace when needed, all while having the flexibility to maneuver easily.

Conclusion

My Da Fins have become as essential to my surf photography as my camera. They offer the comfort, efficiency, maneuverability, and durability that I need to excel in this challenging environment. If you're a photographer, surfer, or ocean enthusiast looking for the ideal fin for your ocean adventures, I can't recommend Da Fin enough. They’ve certainly helped me capture some of my best work in the surf!

Safeguarding My Passion: Why I Trust SDK Cases for My Global Surf Photography Ventures

Hello everyone, Tommy Pierucki here! As a photographer who travels globally to capture the essence of the world's best longboard surfers, I'm often asked about how I keep my camera gear safe during my travels. My answer is simple yet crucial: SDK cases. These cases have been my go-to gear protection, especially when I'm on the move, chasing the perfect wave and the perfect shot. Let me walk you through why SDK cases are indispensable for my photography adventures.

Uncompromised Protection in Diverse Environments

The journey to photograph longboard surfers takes me across various climates and conditions, from sandy beaches and humid coastlines to bustling city environments. SDK cases offer unmatched protection against these diverse elements. Their robust build shields my gear from sand, water, and even the occasional knock or drop. This durability is essential when covering action-packed surf events, where quick moves and unpredictable conditions are part of the game.

Tailored to Fit My Needs

As a surf photographer, my gear includes an array of cameras, lenses, drones, and other accessories, each requiring specific care. SDK cases come with customizable foam inserts, allowing me to create a snug fit for each piece of equipment. This customization ensures that every item, whether it's a drone flying above the waves or a telephoto lens capturing a surfer's intricate maneuver, is securely housed and protected.

Travel-Friendly Features

Frequent flying is a part of my job, and navigating airports with camera gear can be daunting. SDK cases are designed with travel in mind. They are lightweight yet sturdy, making them easy to transport. Their TSA-approved locks add an extra layer of security, giving me peace of mind when my gear is out of sight. Also, the ergonomic design and smooth-rolling wheels make maneuvering through crowded airports a breeze.

Battle-Tested Against the Elements

When shooting surfers, I often find myself in harsh environmental conditions. SDK cases are engineered to be weather-resistant, offering protection against moisture, dust, and extreme temperatures. This feature is particularly important for maintaining the pristine condition of my gear, as saltwater and sand can be detrimental to camera equipment.

Professionalism in Every Aspect

Presenting myself professionally is key in my field, and SDK cases help me make the right impression. Their sleek, sophisticated design speaks volumes about my commitment to my craft. When I arrive at a location with SDK cases, there’s an immediate sense of professionalism and preparedness that precedes the work I do.

Conclusion

In the fast-paced and physically demanding world of longboard surf photography, having reliable, robust, and functional gear protection is non-negotiable. SDK cases have consistently met and exceeded my expectations, ensuring my equipment is always ready for action, no matter where in the world I am. They are more than just cases; they are an integral part of my journey in capturing the thrilling world of longboard surfing.

Mastering Slow Shutter Surf Photography in the Ocean's Embrace

Capturing the fluid, dynamic beauty of the ocean and its surfers is a challenge many photographers relish, especially when using a slow shutter technique. Shooting with a slow shutter speed while being amidst the waves offers an artistic approach to surf photography, blending motion and time into a single frame. In this blog post, we'll explore tips and strategies for creating stunning slow shutter images in the challenging environment of the ocean.

Understanding Slow Shutter Speed

Slow shutter photography involves using a longer exposure to blur motion, creating a sense of movement and fluidity. In the context of surf photography, it can transform waves and surfers into ethereal, dreamlike figures.

Essential Gear

Camera and Water Housing

  • A DSLR or mirrorless camera with manual settings is ideal. Ensure your camera is encased in a reliable water housing to protect it from the ocean's elements.

Tripod or Stabilization Gear

  • In-water stabilization gear is crucial since even slight movements can blur the entire image. Look for floating tripods or stabilization platforms designed for aquatic use.

Neutral Density (ND) Filters

  • ND filters are essential for managing light and achieving slower shutter speeds in bright conditions.

Camera Settings for Slow Shutter Surf Photography

Shutter Speed

  • Start with a shutter speed of 1/15th to 1/30th of a second. This range is slow enough to blur motion but fast enough to retain some detail.

Aperture and ISO

  • Set a smaller aperture (higher f-number) to reduce light intake, allowing for slower shutter speeds without overexposure.

  • Keep the ISO as low as possible to minimize noise.

Techniques for Success

Panning with the Subject

  • Move your camera along with the surfer’s motion. This technique keeps the surfer relatively sharp while blurring the water around them.

Choosing the Right Moments

  • Look for dynamic movements, such as a surfer carving a wave or water splashing. These moments capture the essence of movement.

Experiment with Different Speeds

  • Don't be afraid to experiment with various shutter speeds to see how different levels of blur affect your image.

Overcoming Challenges

Focus

  • Autofocus can struggle in these settings, so consider manual focusing on a predetermined spot where you expect the action to occur.

Light Management

  • Use ND filters to manage the bright sunlight. Balancing the light is crucial in maintaining the desired exposure.

Stability

  • Maintain a steady hand or use stabilization gear, as unwanted camera shake can lead to excessive blur.

Post-Processing Tips

  • Use editing software to fine-tune exposure, contrast, and color. Slow shutter images often benefit from slight adjustments in post-processing.

Conclusion

Slow shutter photography in the surf is an exquisite way to capture the ocean's beauty and the exhilaration of surfing in a unique, artistic manner. With the right gear, settings, and techniques, you can create stunning images that convey motion and emotion in a way that traditional photography cannot. Remember, the key to success in this style of photography is experimentation and patience. Embrace the learning process and let the ocean be your muse.

Why I Choose AquaTech Water Housings and Lens Ports for My Canon R5: Insights from Tommy Pierucki

Hello, everyone! I'm Tommy Pierucki, a passionate photographer who loves capturing the dynamic essence of the ocean and its waves. Over the years, I've experimented with various gear and setups, but when it comes to protecting and enhancing my Canon R5 for surf and underwater photography, I consistently turn to AquaTech water housings and lens ports. Let me share with you why I believe AquaTech is the best choice for my photography needs.

Unmatched Protection

When you're out in the ocean, your camera is exposed to elements that can be damaging. Saltwater, sand, and even the sheer force of waves pose significant risks. AquaTech water housings are engineered to withstand these harsh conditions, giving me the confidence to focus on my shooting without worrying about my Canon R5. The build quality is exceptional - it's robust and seals perfectly, ensuring that my equipment stays dry and safe, even in challenging environments.

Ergonomic Design

Comfort and ease of use are crucial when you're shooting in water for extended periods. AquaTech housings are designed with ergonomics in mind. The controls are intuitively placed, allowing me to adjust settings quickly and efficiently. This ergonomic design means I can react in the moment to capture that perfect shot, which is often what surf photography is all about.

Crystal Clear Lens Ports

The clarity of the images I can capture with AquaTech's lens ports is second to none. They offer a range of ports to fit different lenses, which is perfect for someone like me who likes to switch between wide angles and zoom lenses. The optical quality of the glass in these ports ensures that my images are sharp and clear, capturing every detail of the wave or the surfer I am photographing.

Streamlined and Lightweight

Surf photography often requires agility and the ability to move freely in the water. AquaTech housings are streamlined and lightweight, minimizing drag in the water. This design not only makes it easier to swim and maneuver but also reduces fatigue, allowing me to shoot for longer periods and capture more of the action.

Reliability and Durability

In surf photography, your gear is constantly put to the test. AquaTech housings have proven to be incredibly reliable and durable. I've used them in various conditions - from calm seas to rough, choppy waters - and they've never let me down. Their reliability gives me peace of mind, knowing that I can count on my equipment to perform, no matter what Mother Nature throws my way.

Conclusion

For anyone serious about surf or underwater photography, particularly those using a Canon R5 like myself, I cannot recommend AquaTech water housings and lens ports enough. They strike the perfect balance between protection, functionality, and ergonomic design, allowing me to capture the beauty and power of the ocean in all its forms. In the world of surf photography, having the right gear makes all the difference, and for me, AquaTech is a crucial part of that equation.

Budget-Friendly Guide to Starting Surf Photography Amidst the Waves

Embarking on surf photography while immersed in the ocean’s dynamic environment is an exhilarating yet challenging endeavor, especially when you’re mindful of your budget. Capturing the art of surfing from within the water's embrace requires specific gear and techniques. This blog post is designed to guide aspiring surf photographers on how to begin this adventure without breaking the bank.

1. Choosing the Right Camera and Housing

Camera Options:

  • Entry-Level DSLR or Mirrorless Camera: Consider affordable models like the Canon EOS Rebel series or Nikon D3500. These cameras offer great image quality for their price.

  • Action Cameras: A GoPro or similar action cameras are budget-friendly and offer robust waterproof capabilities for ocean photography.

Housing:

  • Affordable Water Housings: Look for third-party housings specifically designed for your camera model. Brands like Meikon and Polaroid offer budget-friendly options.

  • DIY Solutions: For the truly budget-conscious, DIY waterproof solutions can work, but be mindful of the risks involved.

2. Lenses for Surf Photography

For those just starting, a versatile and affordable lens is key.

  • Zoom Lenses: A zoom lens like a 18-55mm can be a good start for DSLRs. For action cameras, you'll typically use the built-in lens.

3. Accessories on a Budget

  • Floating Straps: Essential for keeping your gear safe in the water.

  • Anti-Fog Inserts: Prevent your housing from fogging up and ruining your shots.

  • Protective Gear: Simple silicone grease can help maintain O-rings in housings, and a cheap neoprene cover can protect your camera when not in use.

4. Mastering the Basics

Understanding the Ocean:

  • Spend time observing the waves and understanding surf patterns. Safety and awareness are crucial in surf photography.

Start with Basics:

  • Focus on composition and getting comfortable shooting in the surf. Master shooting in various lighting conditions and work on framing your subjects creatively.

5. Post-Processing on a Budget

  • Free or Affordable Software: Utilize free editing software like GIMP or affordable ones like Adobe Lightroom's basic plan for post-processing.

6. Learning and Growing

  • Online Resources: Utilize free online tutorials and forums to improve your skills. Websites like YouTube have countless tutorials that can help you learn the ins and outs of surf photography.

  • Practice: There’s no substitute for practice. The more you shoot, the better you’ll get.

7. Selling Your Work

  • Stock Photography: Websites like Shutterstock and Adobe Stock can be a starting point for selling your photos.

  • Local Galleries and Surf Shops: Partner with local businesses for showcasing your work.

Conclusion

Starting surf photography from within the swell of the ocean waves on a budget is entirely possible. It requires careful selection of gear, a willingness to learn, and lots of practice. Remember, the best equipment you can have is your creativity and understanding of the ocean. So, gear up, dive in, and start capturing the incredible world of surfing!

Understanding the Exposure Triangle in Photography: A Beginner's Guide

For budding photographers, grasping the concept of the exposure triangle is crucial to mastering the art of photography. The exposure triangle is a fundamental concept that helps photographers understand how the combination of aperture, shutter speed, and ISO affects the exposure of their photographs. This blog post aims to demystify these elements, explaining how they interact and influence the final image.

What is the Exposure Triangle?

The exposure triangle is a term used to describe the relationship between three critical components of exposure in photography:

  1. Aperture: The size of the lens opening that controls the amount of light entering the camera.

  2. Shutter Speed: The duration for which the camera shutter is open to expose light onto the camera sensor.

  3. ISO: The sensitivity of your camera's sensor to light.

These three elements work in tandem to achieve the correct exposure for your photos. Balancing them correctly is key to producing well-exposed images.

Aperture: Depth of Field and Light

Aperture is measured in f-stops (e.g., f/1.8, f/4, f/16). A lower f-stop means a larger aperture, allowing more light into the camera. This also creates a shallow depth of field, which is excellent for portraits or when you want to isolate the subject from the background. Conversely, a higher f-stop results in a smaller aperture, less light, and a greater depth of field, suitable for landscape photography.

Shutter Speed: Capturing Motion

Shutter speed is measured in seconds or fractions of a second. A faster shutter speed (e.g., 1/1000) can freeze fast-moving subjects, perfect for sports or action photography. A slower shutter speed (e.g., 1 second) allows more light and can capture the motion, ideal for creating a sense of movement or for low-light conditions.

ISO: Sensitivity to Light

ISO determines how sensitive the camera sensor is to light. A lower ISO (e.g., 100 or 200) is less sensitive to light and produces the sharpest images with minimal grain or noise. It’s ideal for bright conditions. A higher ISO (e.g., 3200 or 6400) is more sensitive to light, which is useful in darker environments but can result in more noise.

Balancing the Triangle

The key to using the exposure triangle effectively is understanding that changing one element requires adjustments in the others to maintain the desired exposure. For instance:

  • If you open the aperture for a blurred background (low f-stop), you may need to use a faster shutter speed or lower the ISO to prevent overexposure.

  • In low light, if you increase the ISO, you might need to decrease the aperture (higher f-stop) or use a faster shutter speed to avoid overexposure.

Conclusion

Mastering the exposure triangle is fundamental in photography. It empowers photographers to creatively control their images, whether they seek to capture sharp landscapes, freeze rapid action, or shoot in challenging light conditions. Remember, photography is as much about technical skills as it is about creativity. Experimenting with different settings of aperture, shutter speed, and ISO will not only improve your technical understanding but also enhance your creative expression through photography.

Mastering Focus Settings for Surf Photography in the Waves

Capturing the dynamic and unpredictable nature of surfing from the midst of the ocean waves demands not only skill and the right gear but also a deep understanding of camera focus settings. As a photographer positioned within the surf, you’re tasked with tracking fast-moving subjects and dealing with challenging lighting and environmental conditions. In this blog post, we will delve into the best focus settings to help you nail sharp, stunning surf shots from the heart of the action.

Understanding Autofocus Modes

The key to successful surf photography amidst the waves is to utilize your camera's autofocus (AF) modes effectively. Here are the most suitable AF modes for this type of photography:

1. Continuous Autofocus (AF-C or AI Servo AF)

  • What It Is: This mode continuously adjusts the focus as long as you half-press the shutter button or hold the AF button.

  • Best For: Tracking surfers as they move rapidly across the water.

2. Single-Point Autofocus

  • What It Is: Focuses on a single, selected point in the frame.

  • Best For: Composing shots with the surfer in a specific area of the frame.

Choosing the Right Focus Points

Selecting the right number of focus points is crucial for maintaining focus on your subject.

Dynamic Area AF

  • How It Works: You select a primary focus point, and the camera uses surrounding points if the subject moves.

  • Advantage: Ideal for surfers moving unpredictably through the frame.

Group Area AF

  • How It Works: Focuses using a cluster of points, which is excellent for maintaining focus on a small, fast-moving subject like a surfer.

Tips for Optimizing Focus

Pre-Focus on the Action Area

  • Technique: Before the surfer enters the frame, pre-focus on the area where you expect the action to happen.

  • Benefit: Reduces the time your camera takes to focus when the action starts.

Use Back-Button Focus

  • Setup: Assign a button on the back of your camera to initiate autofocus.

  • Advantage: Allows for quicker response times and separates focusing from shutter release, giving you more control.

Dealing with Low Light and Contrast

In conditions with low light or low contrast between the surfer and the background:

Increase AF Sensitivity

  • Adjustment: Some cameras allow you to increase the sensitivity of the autofocus system to better handle low-contrast scenes.

Manual Focus Assistance

  • Technique: Use manual focus with your camera’s focus peaking or magnification features to assist in nailing focus in challenging conditions.

Conclusion

Capturing surfers while you're positioned among the waves presents unique challenges, especially in terms of focusing. Utilizing the right autofocus modes, selecting the appropriate focus points, and employing techniques like pre-focusing and back-button focus are essential. Remember, practice is key. The more you shoot in these conditions, the better you'll become at quickly and accurately focusing on fast-moving subjects. With these focus strategies in your toolkit, you're well on your way to capturing breathtaking surf photography right from the heart of the ocean’s action.

Affordable Gear for Surf Videography: Camera, Lens, and Tripod Options

Embarking on surf videography doesn't mean you have to spend a fortune on equipment. For those on a budget, capturing the exhilarating action of surfers from the beach is still within reach. This blog post will highlight some affordable camera bodies, compatible long lenses, and tripods, focusing on their suitability for surf videography.

Camera Body Options

1. Canon EOS Rebel T7i

  • Price Range: Around $700-$800

  • Features: 24.2MP APS-C CMOS sensor, Full HD 1080p video recording, Dual Pixel CMOS AF.

  • Pros: Excellent autofocus, vari-angle touchscreen, user-friendly interface.

  • Cons: Limited to 1080p, not 4K.

2. Panasonic Lumix G85

  • Price Range: Approximately $700-$800 (body only)

  • Features: 16MP Micro Four Thirds sensor, 4K video recording, 5-axis image stabilization.

  • Pros: Weather-sealed body, effective stabilization, 4K video capability.

  • Cons: Lower resolution sensor, smaller sensor size.

Comparison:

The Canon T7i offers superior autofocus, which is crucial for tracking fast-moving surfers, but is limited to 1080p video. The Panasonic G85, although with a lower resolution sensor, provides 4K video and better stabilization, making it a strong contender for surf videography.

Lens Options

1. Canon EF 75-300mm f/4-5.6 III (for Canon T7i)

  • Price Range: About $200-$250

  • Features: Telephoto zoom, lightweight design.

  • Pros: Affordable, good for distant shots.

  • Cons: No image stabilization, slower autofocus in low light.

2. Panasonic Lumix G Vario 100-300mm f/4-5.6 II (for Lumix G85)

  • Price Range: Around $550-$650

  • Features: Telephoto zoom, weather-sealed, optical image stabilization.

  • Pros: Covers a great focal range, stabilization complements the G85’s in-body stabilization.

  • Cons: Higher cost, relatively slower autofocus.

Comparison:

The Canon EF 75-300mm lens is budget-friendly and suitable for beginners but lacks image stabilization. The Panasonic 100-300mm lens, while more expensive, offers superior reach and stabilization, crucial for capturing stable, high-quality surf videos.

Tripod Options

1. AmazonBasics 60-Inch Lightweight Tripod

  • Price Range: Under $30

  • Features: Lightweight, adjustable-height legs, 3-way head.

  • Pros: Very affordable, easy to carry.

  • Cons: Not suitable for heavy setups, limited durability.

2. Magnus VT-3000 Tripod System with Fluid Head

  • Price Range: Approximately $150-$200

  • Features: Fluid head for smooth panning, supports up to 6.6 lbs, height-adjustable.

  • Pros: Fluid head for smooth video, more robust and stable.

  • Cons: Heavier, higher cost.

Comparison:

The AmazonBasics tripod is an entry-level option suitable for lightweight cameras. However, the Magnus VT-3000, with its fluid head, offers better stability and is more suited for video work, making it a worthwhile investment for aspiring surf videographers.

Conclusion

When on a budget, choosing the right gear for surf videography requires balancing cost, functionality, and compatibility. The Canon EOS Rebel T7i and Panasonic Lumix G85 are both excellent choices, each with its strengths. Lens-wise, the Canon EF 75-300mm is more affordable, while the Panasonic 100-300mm offers better features for video. For tripods, the Magnus VT-3000 is a solid choice for those serious about surf videography. With these options, capturing the thrilling world of surfing is both achievable and affordable.